Sites that do not have permanent connections to the Internet, or to other servers on the Domino network, can send and receive messages over a transient connection, such as a dialup connection.
For example, an organization that does not have a constant connection to the Internet might use a remote mail server at its ISP to hold mail until a local mail server calls in to the ISP server to retrieve or ″pull″pending messages from the ISP server. If the ISP mail server supports the SMTP ETRN command, you can configure the Domino server to ″pull″ mail over SMTP. A local Domino server can also use Notes routing protocols to pull messages from a remote Domino server over a Notes Direct Dialup connection.
Setting up Domino to pull mail from a remote server: By default, when a local server initiates a connection to a remote server, it uses the connection to push messages to the remote server. The local server does not ″pull″ pending messages from the remote server. Instead, the local server only receive mail from the remote server when the remote server initiates a connection to route those pending messages. To change this default behavior and have the local server retrieve messages from a remote server during the same session in which it sends messages to the remote server, set up the local server to send a ″pull request″ to the remote server.
When the local server is configured to send a ″pull request,″ it sends a message to the remote serverrequesting that the server deliver any messages it has pending for the local server. The remote server receiving the pull request can be any SMTP host; it does not have to be a Domino server. When the remote server receives the ″pull request,″ it checks its mail queues for any messages pending for the initiating server and starts the processing necessary to transfer those messages.
If you are using SMTP routing, you must make sure that ETRN protocol extension has been enabled on the other server (the one receiving the ″pull request″), or it will not be able to receive the pull request. Also the remote server must be able to resolve the DNS host name of the initiating server to an IP address to ensure that the messages can be sent. Generally, ETRN requires that the initiating server has a static IP address, which is available in DNS to the server holding the pending messages.
Note: Some ISPs use DHCP to assign a host a new IP address whenever it connects. If the remote system assigns a new IP address every time you connect, do not configure dialup systems to use pull routing.
When configuring dialup routing, you can indicate how long the initiating server keeps the line open to allow the remote server to establish a connection. This is useful to prevent the initiating server from hanging up the line before the remote server is able to attempt to transfer any pending mail. The initiating server sends a pull request, then pushes any messages it has for the remote server, and then waits for any messages pending from the remote server. When sending a pull request, the initiating server can also request messages for other servers, domains, hosts, or any queue name within your organization for which the initiating server is responsible.
The ETRN command: With ETRN support, a dialup SMTP host can notify an SMTP server holding messages for it when to deliver those messages. ETRN enables servers to use bandwidth resources efficiently, because the dialup host sends and receives mail during the course of a single session.
ETRN stands for Extended Turn and is an SMTP service extension command, defined in RFC 1985. that provides improved security over the SMTP TURN command, originally defined in RFC 821. The TURN command allows hosts involved in a SMTP session to reverse their respective roles, so that, for example, if Server1 is sending an SMTP message to Server2, Server1 can issue the TURN command so that Server2 then becomes the sender and Server1, the receiver.
However, because the TURN command has no mechanism for verifying the identity of the calling host, use of the command poses a security risk. A malicious user who spoofs the identify of a server can falsely appear to belong to a someone else’s Internet domain and then use the TURN command to retrieve messages intended for that domain.
The ETRN command plugs this security hole by redefining the sending and receiving roles during the course of the SMTP session. For example, after Server1 issues the ETRN command to Server2, ETRN instructs Server2 to open a new SMTP session with Server1. Because Server2 has to resolve the name of Server1 to an IP number in the DNS, Server2 is more likely to open a new SMTP session with the correct machine.
For Domino to use ETRN to retrieve new mail over a dialup connection, your ISP must support this command. Check with your ISP to verify whether they support this command or not. You can also verify support for the command by establishing a telnet connection to port 25 of the ISP’s SMTP server. After the SMTP session starts, type EHLO and press Enter. The response from the ISP’s SMTP server indicates whether the server supports ETRN. For more information about Notes Direct Dialup Connections and Network Dialup Connections, see the chapter ″Setting Up Server-to-Server Connections.″
To set up a server to route mail over a transient connection:
1. For SMTP routing, on the Router/SMTP Basics tab of the Configuration Settings document for the
sending server, enable SMTP for messages sent outside the local Internet domain.
For information on how to enable SMTP for outbound Internet mail, see the topic ″Setting up SMTP
routing to external Internet domains″ earlier in this chapter.
2. From the Domino Administrator, click the Configuration tab and then expand the Messaging section.
3. Click Connections.
4. Click Add Connection.
5. On the Basics tab, complete these fields:
Connection type Choose one:
Network Dialup - Choose this option for servers that will route mail over SMTP using this
dialup connection. You can also use this option for NRPC routing.
Notes Direct Dialup - Choose this option only for servers that will use this connection to
route mail over NRPC to another Domino server.
Source server
The Notes hierarchical name of the local Domino server initiating the routing request, for
example, SMTP/East/Acme.
Source domain
The Domino domain of the source server, for example, AcmeEast
Use the LAN port(s)
For Network dialup connections, enter the port name for the Domino TCP/IP port on the local server.
Use the port(s)
For Notes Direct Dialup connections, specifies the name of the communications port that
the source server uses.
Destination server
The name of the Domino server, or SMTP server to which you want to route mail.
For SMTP routing connections to an ISP server, enter the host name of the ISP server, for
example, internet.isp.com. Depending on the requirements of your ISP, the specified host
can be used for outbound mail, inbound mail (using ETRN), or both. If the host is used
for outbound mail, enter the same host name on the Router/SMTP - Basics tab of the
Configuration Settings document, in the field ″Relay host for messages leaving the local
Internet domain.″
Destination domain
For routing to Domino servers over Notes routing, enter the Domino domain of the destination server.
Leave this field blank when configuring SMTP routing to an ISP server.
6. On the Routing and Replication tab, complete these fields, and then click Save & Close:
Field Description
Routing task
Select Mail routing
Router type
Push/Wait - Select this option when the destination server is used for outbound mail only, and initiates the connection to the source server. After the source server establishes the dialup connection, it waits to receive a connection from the destination server. When the destination server connects and issues a ″pull request,″ the source server then pushes any messages pending for the remote server.
Push Only - (default) Select this option if the destination server is used for outbound mail only. The source server calls the destination server and sends messages queued for that destination. You’ll need to create a separate Connection document to the server used for inbound mail.
Pull Push - Select this option if the ISP host to which the source server connects is used for both inbound and outbound routing. The source server calls the destination server, pushes, or sends, any pending messages for that destination, and then ″pulls″ messages from the destination server (actually, the calling server issues a request to the other server to push messages back to it). The destination server pushes any pending messages back to the source server. If you select this option, you must specify whether the source server issues the pull request using Notes routing or SMTP.
Pull Only - Select this option if the destination server is used for inbound mail only. The source server calls the destination server and issues a pull request (a request for the other server to push back messages). The destination server pushes any pending messages to the source server. You’ll need to create a separate Connection document to the server used for outbound mail.
Pull routing request protocol
Notes RPC - The server makes the pull request using Notes Remote Procedure Calls.
SMTP - The server makes the pull request using SMTP. Select this option for SMTP connections that support ETRN.
Note: When the destination server is a Domino server, the protocol specified in this field
only applies when the Router type is set to Pull Only. By contrast, if the Router type is
set to Pull/Push, the sending server always uses the same protocol to issue the pull
request that it used to transfer messages to the destination server.
Request the following when issuing a pull request
Specifies the servers, hosts, or domains on whose behalf the source server issues a pull request. As a result of the request, the remote server sends all messages it is holding for the specified entities. Choose one or more of the following:
vSource server name (both Notes and Host) - (default) The source server requests that the remote server transfer any messages addressed to recipients on the source server. The source server receives messages for addresses that specify either the Domino server name or the DNS host name (for example, CN=Server/Org=ACME or server1.acme.com).
vAll local primary Internet domains listed Global Domain(s) - (default) The source server requests that the destination server transfer all messages it is holding for recipients with addresses in the primary Internet domain named in the source server’s Global Domain document (for example, acme.com).
v All alternate Internet domain aliases listed in Global domain(s) - The source server requests that the destination server transfer all messages it is holding for recipients with addresses in any of the Internet domain names listed in the source server’s Global Domain document (for example, acme.com, sales.acme.com, acme-alias.com).
v The following servers/domains/hosts - The source server requests that the destination server transfer all messages it is holding for recipients in the specified Domino servers,
Internet domains, or DNS host names. If you select this option, list the specific servers,
domains, or hosts on whose behalf the pull request is made. Use this option if the
remote server requires the calling server to use a specific syntax or name when
sending the ETRN pull request to initiate message transfer.
Pull router timeout
The number of seconds that the calling server waits for the answering server to respond to a pull request before disconnecting. The default is 30 seconds.
7. For outbound SMTP connections, configure other servers on the local network to use the dialup system as a relay.
8. The change takes effect after the next Router configuration update. To put the new setting into effect immediately, reload the routing configuration.
2008年10月30日星期四
CMD 在批处理中的用法
Syntax
     CMD [charset] [options] [My_Command]

Options
  /C     Carries out My_Command and then terminates
  /K     Carries out My_Command but remains

  My_Command : The NT command, program or batch script to be run.
             This can even be several commands separated with '&&'
             (the whole should also be surrounded by "quotes")

  /T:fg  Sets the foreground/background colours

  /X     Enable extensions to CMD.EXE
         under Windows 2000 you can also use /E:ON

  /Y     Disable extensions to CMD.EXE
         under Windows 2000 you can also use /E:OFF

  /A     Output ANSI Characters
  /U     Output UNICODE Characters
         These 2 swiches are useful when piping or redirecting to a file
         Most common text files under WinNT are ANSI, use these switches
         when you need to convert the character set.

 more below
Win2K / XP switches
The CMD switches below were first introduced with Windows 2000
   /D Ignore registry AutoRun commands
     HKLM | HKCU \Software\Microsoft\Command Processor\AutoRun

  /F:ON Enable auto-completion of pathnames entered at the CMD prompt

  /F:OFF Disable auto-completion of pathnames entered at the CMD prompt (default)

  At the command prompt Ctrl-D gives folder name completion and
  Ctrl-F gives file and folder name completion.

  These ctrl keys build up a list of paths that match and display the
  first matching path. Thereafter, repeated pressing of the same control
  key will cycle through the list of matching paths.  Pressing SHIFT
  with the control key will move through the list backwards.

  /Q    Turn echo off

  /S    Strip quote characters from the command_line

  /V:ON Enable delayed environment variable expansion
        this allows a FOR loop to specify !variable! instead of %variable%
        expanding the variable at execution time instead of at input time.

  /V:OFF Disable delayed environment expansion.

  Environment expansion preference can be set permanently in the registry
  HKLM | HKCU  \Software\Microsoft\Command Processor\DelayedExpansion
  Set to either 0x1 or 0x0

  /knetdiag /debug
  /knetdiag /fix

  The knetdiag switches are undocumented and work in XP only
  they list and (may) fix these networking issues.

If /C or /K is specified, then the remainder of the command line is
processed as an immediate command in the new shell. Multiple commands
separated by the command separator '&&' are accepted if surrounded by quotes.

The following logic is used to process quote (") characters:

   1.  If all of the following conditions are met, then quote characters
       on the command line are preserved:

       - no /S switch
       - exactly two quote characters
       - no special characters between the two quote characters,
         where special is one of: &<>()@^|
       - there are one or more whitespace characters between the
         the two quote characters
       - the string between the two quote characters is the name
         of an executable file.

   2.  Otherwise, old behavior is to see if the first character is
       a quote character and if so, strip the leading character and
       remove the last quote character on the command line, preserving
       any text after the last quote character.
Command.com vs cmd.exe
All the commands on these pages assume you are running the 32 bit command line (cmd.exe)
CMD.exe is the NT/XP equivalent of Command.com in previous operating systems. The older 16 bit command processor command.com is supplied to provide backward compatibility for 16 bit DOS applications. e.g. command.com will fail to set %errorlevel% after certain commands.
To ensure that a batch file will not run if accidentally copied to a Windows 95/98 machine you should use the extension .CMD rather than .BAT
The COMSPEC environment variable will show if you are running CMD.EXE or command.com
Subject to licensing issues, it is possible to run the Windows 2000 or Win XP version of CMD.EXE under NT. This is not true of all commands, e.g. any command that involves NTFS disk access (such as cacls) should not be moved between OS versions.
Opening CMD from Windows Explorer
You can open a new CMD prompt by choosing START, RUN, cmd, OK
Related Registry Keys:
;Allow UNC paths at command prompt
[HKEY_LOCAL_MACHINE\SOFTWARE\Microsoft\Command Processor]
"DisableUNCCheck"=dword:00000001
Previous Commands
Pressing the UP arrow will list previous commands entered at the command prompt.
Other DOSKEY function keys are loaded by default (F7, F8, F9)
Copy and Paste
QuickEdit mode allows the use of cut and paste functions at the Command Prompt.
Open Control Panel, Console and check the QuickEdit Mode box.
COPY:
With your left-mouse button, select a line of text, now right-click anywhere in the window to COPY. (in NT 4 there is no popup menu)
This saves the selected text to the clipboard.
PASTE:
Now right-click again anywhere in the CMD window to PASTE the text to the command line.
Note: moving the cursor and toggling Insert/Overwrite is also possible.
Press ESC to cancel the selection and return to editing mode.
Using CMD in a batch script
In a batch script CMD will start a new instance of CMD.exe which will appear in the same window. The EXIT command will close the second CMD instance and return to the previous shell.
A method of calling one Batch script from another is to run a command like
CMD /c C:\docs\myscript.cmd
The output of CMD can be redirected into a text file. Notice that where CMD /c is used, the EXIT command is not required.
The environment Variable %CMDCMDLINE% will expand into the original command line passed to CMD.EXE
Pausing a batch script
Execution of any batch script can be paused by pressing CTRL-S
This also works for pausing a single command such as a DIR listing
Pressing any key will resume the operation.
Stopping a batch script from running
Execution of any batch script can be stopped by pressing CTRL-C
If one batch file CALLs another batch file CTRL-C will exit both batch scripts.
If CMD /c is used to call one batch file from another then CTRL-C will cause only one of the batch scripts to terminate. (see also EXIT)
Long Commands
Under Windows NT, the command line is limited to 256 characters.
Under Windows 2000, the command line is limited to 2046 characters.
Under Windows XP, the command line is limited to 8190 characters.
For all OS's NTFS and FAT allows pathnames of up to 260 characters.
A workaround for the limited pathname length is to prefix \\?\
for example:
\\?\C:\TEMP\Long_Directory\Long_Filename.txt
The above limits are often encountered when using long share names or drag and dropping files onto a batch script.
Full Screen
The key combination ALT and ENTER will switch a CMD window to full screen mode.
press ALT and ENTER again to return to a normal Window.
Command Extensions
Much of the functionality of CMD.exe can be disabled - this will affect all the internal commands, Command Extensions are enabled by default. This is controlled by setting a value in the registry: HKCU\Software\Microsoft\Command Processor\EnableExtensions Alternatively under Win XP you can run CMD /e:on or CMD /e:off
"Those who can command themselves, command others" - Hazlitt
Related:
EXIT - Use this to close a CMD shell and return.
CALL - Call one batch program from another
START - Start a separate window to run a specified program or command
DOSKEY Edit command line, recall commands
Q156276 - Cmd does not support UNC names as the current directory
Powershell: You may run the CMD shell under Powershell, Exit will return you to the PS prompt.
Equivalent bash command (Linux): bash - run the bash shell (also csh, ksh, sh)
2008年10月28日星期二
什么是Smart Host Relay,如何在Exchange、Domino、Eyou、Qmail等邮件服务器中实现Smart Host Relay?
什么是Smart Host Relay,如何在Exchange、Domino、Eyou、Qmail等邮件服务器中实现Smart Host Relay?
答:
本机的 MTA 不对远程的邮件做直接投递,而是把邮件交给 smart host 来做 relay。之所以叫做 smart host,是因为以前在企业内部的 MTA,无法得知投递远程邮件所需要的信息(MX record, etc.),所以把邮件交给邮件网关进行投递,因为邮件网关 smart enough to know 如何对远程的邮件进行投递。
1、Exchange中smart host的设置过程:
l 新建àConnectorsàAdministrative Groupsà在Exchange System Manager SMTP Connectorà General中选择Forward all mail through this connector to the following smart host,填写RiskFilter的域名或IP(注:填写IP时需要用[]) Add Bridgehead中选中Server 表中主机名àAddà在local bridgeheads OKàSMTPàAdd Address SpaceàAddà在Address Space 确定 即可。
l 连接控制(只允许RiskFilter连接到Exchange)
l 转发控制(只允许RiskFilter通过Exchange转发邮件)
2、Domino服务器的ESMTP和SmartHost Relay设置过程:
l 在Domino服务器设置ESMTP功能的步骤:
1)通讯录 — 服务器 — 服务器 — 选择要配置的服务器名称 — 端口 — Internet端口 — 邮件 — 验证选项 — 名称和口令 —邮件(SMTP返回)选是
2)重新启动Domino使配置生效 (命令 restart server)
l 在Domino服务器上配置Smart Host Relay功能的步骤:
1)通讯录 — 服务器 — 配置 — 选择要配置的服务器名称 — 路由器及SMTP — 基本 — 离开本地Internet网络域的消息转发主机 —填入RiskFilter的IP地址或主机名(IP地址需要加方括号)
2)重新启动Domino使配置生效 (命令 restart server)
3、EYOU服务器中SmartHost、白名单设置过程:
l 在配置文件eyou_smtpd_config中加入 smtproute RF_IP(RiskFilter的IP地址),重新启动eYou邮件服务器,即可实现Smart Host Relay的功能
l 在配置文件eyou_smtpd_config中加入 relayhost RF_IP(RiskFilter的IP地址),重新启动eYou邮件服务器,即可实现其信任这个IP,对这个IP地址的连接请求不做任何限制。
4、Qmail中smart host的设置过程:
1)停止Qmail服务 stop qmail
2)备份配置文件 backup /var/qmail/control/smtproutes
3)添加SMG的IP地址 echo :your.smart.server.name > /var/qmail/control/smtproutes
4)启动Qmail服务 start qmail
2008年10月23日星期四
Domino router
(Domino Administrator is called DA in the document)
Start/stop/restart mail router
Stop/start/restart router
tell router quite
load router
DA->server->Status->Server tasks->right click router->Stop/start/restart task
Recalculating the server's routing table
By default, at intervals of approximately 5 minutes, or after you restart the task, the router examines the Domino Directory for changes that would warrant rebuilding the routing table.
Force update the server's routing table.
Tell router update config
(The router checks the server , server configuration, connection, Adjacent and Non-Adjacent domain documents, and the Notes.in file for changes that might effect the routing topology. The Router then builds a new router table that incorporates that changes. The router repocess any messages currently in mail.box based on the new routing table)
Notice:
The email message will be hold on mail.box when you send email ,if the router has been stopped.
Router configuration example
Use one server for all Internet messages


The following is the configuration steps. (You can find the details of every step on the following document)
1)Enable "SMTP used when sending message outside of the local internet domain" for Mail2
2)Enable SMTP listener task for Mail2
3)Set up DNS correctly to list Mail2 as the connecting server for domain for inbounding mail
4)Enable "SMTP allowed outside of the local internet domain" for Mial1 & Mail3 and listing Mail2 as relay host. (Mail1 & Mail3 use SMTP to transfer message to Mail2)
Or Create a Foreign SMTP Domain document and SMTP connection document that define the route to Mail2 (This way Mail1 & Mail3 use notes routeing to transfer to Mail2)
Use separate servers for inbound and outbound Internet mail

1)Enable "SMTP used when sending message outside of the local Internet domain" for Mail2
2)Enable SMTP listener task for Mail3
3)Set up DNS correctly to list Mail3 as the connecting server for domain for inbounding mail
4)Enable "SMTP allowed outside of the local Internet domain" for Mail1 and listing Mail2 as relay host. (Mail1 use SMTP to transfer message to Mail2)
Or Create a Foreign SMTP Domain document and SMTP connection document that define the route to Mail2 (This way Mail1 use notes routing to transfer to Mail2)
Use two servers to balance Internet mail load

1)Enable "SMTP used when sending message outside of the local Internet domain" for Mail1 & Mail3
2)Enable SMTP listener task for Mail1 & Mail3
3)Set up DNS correctly to list Mail1 & Mail3 as the connecting server for domain for receive inbound mail
4)Enable "SMTP allowed outside of the local internet domain" for Mial2 & Mail4 and listing Mail1 & Mail3 as relay host. (Mail1 use SMTP to transfer message to Mail2)
Or Create a Foreign SMTP Domain document and SMTP connection document that define the route to Mail1 or Mail3 (This way Mail1 use notes routing to transfer to Mail2)
Use SMTP to route mail within the local Internet domain

1)Enable SMTP listener task for Mail1 Mail2 & Mail3
2)Enable "SMTP allowed within the local internet domain" for "MIME message only" for Mail1 Mail2 & Mail3
3)Either having all three server sin same Notes name network or Enable "Servers within the local Domino domain are reachable via SMTP over TCPIP" for each server.
4)Enter the server's Fully quality internet host name field on the Basic tab of the server document,. The local Router uses the value in this field to define the local internet domain in the absence if a Global Domain document. Other Domino servers on the network check this field before attempting inbound SMTP connections to this server. If the field is blank or contains an invalid value, all inbound mail transfers take place over Notes routing.
Notice
The servers must be in the same Notes named network, based on TCP/IP
Mail routing between a third-party server and Domino in the same Internet domain
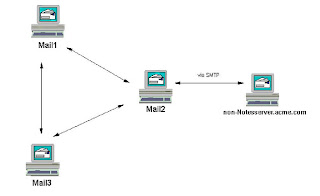
1)Enable the SMTP listener task for Mail2
2)Set up DNS correctly
3)Create a Foreign SMTP Domain document for "*.non-Notesserver.acme.com" and SMTP connection document that links to mail2.
4)Enable "SMTP used when sending messages outside of the local Internet domain″
(If the recipient has a mail file on the third-party server, non-Notesserver.acme.com, their Person document has a forwarding address with the domain ″non-Notesserver.acme.com.″ To route mail over SMTP, Mail1 and Mail3 find a Foreign SMTP Domain document for ″*.non-Notesserver.acme.com″ that corresponds to an SMTP Connection document listing
Mail2 as the server to which to transfer messages. The server sends the message via Notes routing toMail2, which has the field ″SMTP used when sending messages outside of the local Internet domain″enabled on the Router/SMTP-Basics tab of the Configuration Settings document that applies to it. If the message is in Notes format, Mail2 converts it to MIME. Mail2 connects to non-Notesserver.acme.com over TCP/IP and transfers the message over SMTP.
If a user on non-Notesserver.acme.com sends a message to a user on Mail1, Mail2, or Mail3, the server transfers the message over SMTP to Mail2, which has the SMTP listener task enabled on the Basics tab of its Server document, and Mail2 routes the message to its destination over Notes routing.) Use a smart host

1)Set up DNS correctly
2)Enable "SMTP allowed within the local internet domain" for "MIME messages only" for Mail1 Mail2 & Mail3
3)List "smarthost.acme.com" as the "Lcal internet domain smart host" for Mail1 Mail2 & Mail3.
Use all servers to route outbound mail and one to route inbound mail

1)Enable "SMTP used when sending message outside of the local Internet domain" for all three servers.
2)Enable the SMTP listener task for Mail2
3)Set up DNS corredtly to list Mail2 as the connecting server for the acme.com domain for inbound mail.
Create a configuration settings document.
Configuration settings document includes settings thar affect both Notes routing and SMTP routing.
Each server checks the cofiguration settings document in the following order-- a document specific to the server, then a group document for any group the server is in, and then for the default document.
DA->Configuration->Messaging->Configuration->Add configutration->Create a new configuration settings document->Basics->Save & Close.
Set up Notes Routing
To set up routing between servers that are not in the same Notes name network, you must create documents in Domino Directory to specify how to route mail which in the Notes mail system.
(Create connection document to enable message transfer between servers in differern Notes named networks. A connection document specifies how and when two servers connect to exxhange mail and update common database through replication. To route mail between servers in different Notes named networks requires a pair of Connection document, one from each server to the other)
Adjacent Domain
Note:
To define routes between adjacent domains, create a connection documents.
If you deny a domian from sending mail through your domain, the router denies all mail received from that domain, including messages the domain may have passed on from another, non-adjacent domain. There is no way to restrict specific users from routing a Notes Domain, Restrictions apply to all users in specified domain.
DA->Cofiguration->Messaging->Domians->Add Domain->Create a new Domain->Basic complete the proper fields.
Notice
The current Domino domain must have a connection document to this domain.
Non-Adjacent Domain
You can use Non-Adjacent domain to connect to two domain which will supply next-hop domain information.
DA->Cofiguration->Messaging->Domians->Add Domain->Create a new Domain (Select Non-adjacent Domain)->Basic complete the proper fields.
Note: You cannot use wildcards in the restriction fields. You must enter explicit domain names.
By definition , all servers in a domain use the same Domino Directory, only one Non-adjacent domain document is required for each non-adjacent domain. You do not have to create a separate document for each server.
Set up router to external application gateway
Create a Foreign domain document
DA->Cofiguration->Messaging->Domians->Add Domain->Create a new Domain (Select Foreign domian)->Basic complete the proper fields.
Send mail outside the local internet domain
1)Use Relay host
In the configuration settings document that apply to any mail servers that do not connect directly to the Internet, enter the host name of the designated relay host in the "Relay host for messages leaving the local Internet domain" field. When the Router on these internal servers finds a message addressed to a recipient in an external Internet domain, it looks up the specified relay host in the DNS and foreards the message to it.
A relay host is an SMTP server that receives mail form other servers and then transfers. or relays, it to the next SMTP server on the route to the recipient's domain. A relya host can be a Domino SMTP server . or a non-Domino SMTP host
2)Use Foreign SMTP Domain document and an SMTP connection document. (It only can be used between Domino server)
To set this up using Notes protovols, Create a Foreign SMTP Domain document and an SMTP connection document.When the router on a server not connected directly to the Internet find a message address to a recipient in an exteral Internet Domain, the router forwards the message to the Domain in the Foreigh SMTP Domain document, which is connected to the server with an Internet connection by the SMTP Connection document,. When that server receives the message, Its Router connects to the external Internet domain and routes the message.
Notes
If you use a wildcard when specifying which messages to route a domian, you can still restrict messages detined for specific Internet domains using the SMTP Outbound Controls in the Configuration Settings document.
The Router always uses the Foreign SMTP Domain document that most closly match the address. After the Router determins which Foreign SMT Domain document most colosely matches the address of the message, it forwards the message to the specified next domain. If the domain is a real Domino domain. the Router looks in the Domino Directory for a connection to that domain and routes the message. If the domain is a logical domain, the Router checks for an SMTP connection document that describs the next hop for mail routed to that domain.
Create foreign SMTP domain document
DA->Cofiguration->Messaging->Domians->Add Domain->Create a new Domain (Select Foreign SMT domian)->Basic complete the proper fields.
Notice:
Messages Address to Internet Domain: *.*
It means all internet Domain.
Create an SMTP connection document
DA->Configuration->Messaging->connection->Add connection->Basic (Select SMTP)
Source server:The name of the SMTP-enable serverwhere non-SMTP servers send mail destined for the Internet Domains specified in the Foreign SMTP domain document. This server must have access to DNS and have SMTP enabled for sending message outside the local internet domain.
Destination server: A unique, ficitious. placeholder name-- such as all_inernal hosts. Domino does not use the value in this field, but the Connection document will not work if the field is empty. The name you specify must not match the name of any server on ther network.
Destination Domain: The fictitious, logical domain name specified in the internet Domain name field of the corresponding Foreign SMTP domain document. The name in this field links this SMTP connection document with the Foregin SMTP Domain document.
SMTP MTA relay host:
Sepcifies the SMTP host to which the source server transfers outbound mail. This allows a SMTP server to further split internet destinations and configure multiple relays.
If this field is blank, the router transfers outbound mail to the relay host specified in the server's Configuration setting document.
If there is no relay host specified in either this filed ot in the Configuration setting document, the router determines the next hop by looking up the destination domain in the DNS or a local hosts file, depending on the value of "Host name resolution" field on the Router/SMTP- basic tab of the Configuration settings document.
Replication task: Disable
Routing tasl: Mail routing (Because the same routing task is responsible for transferring message over NRPC and SMTP, there's no need to specify SMTP routing. The source server must have SMTP routing enable in it's server document; otherwise, the router discards the information in the SMTP document)
Prepare to send an receive mail to the internet
In some case, a company may have mutiple Internet domain names. Enter thes names as aliases in the Global domain document. And make sure that the DNS is set up to inculde all the Internet domain names that your company uses.
Set up SMTP routing to external Internet domains
DA->Configurations->Configuration settings->Edit Configuration->Touter/SMTP->Basic->Enable "SMTP used when sending message outside the local Internet domain"
rstart router
Set up SMTP routing within the lcoal Internet domain
DA->Configurations->Configuration settings->Edit Configuration->Router/SMTP->Basic-> Select All message on "SMTP allow within the local Internet domain" field.
{SMTP allowed within the local Internet domain
Choose one:
v MIME messages only -- The Router uses SMTP to transfer MIME messages to other Domino servers that are within the same Domino domain and that run the SMTP
Listener.
v Disabled (default) -- The Router uses Notes routing to transfer mail to other servers in the same Domino domain.
v All messages -- The Router uses SMTP to transfer both Notes format and MIME format messages to other Domino servers that are within the same Domino domain and that run the SMTP Listener. This will cause Notes format messages to be converted to MIME format before being transferred. This may cause loss of fidelity and performance. For example, Notes Doclinks will not work.
Note: You can limit the use of SMTP to transfer mail within the Domino domain by
setting the next field (″Servers within the local Domino domain are reachable via
SMTP over TCPIP″) to only allow SMTP within the same Notes named network.
Servers within the local Domino domain are reachable via SMTP over TCPIP
v Always (default) -- The Router can use SMTP to transfer mail to any Domino server in the local Domino domain that runs the SMTP Listener.
v Only if in same Notes named network -- The Router can use SMTP to transfer mail to other Domino servers in the local Domino domain only if the destination server is in the same Notes named network. If the destination server is in the local Domino domain, but resides in a different Notes named network, the Router must use Notes routing to transfer mail.}
Enable a server to receive mail send over SMTP routing
DA->Configuration->Server->select server document->edit server->Basic
Fully qualified internet host name:
In the absence of a Global Domain document, the router use the entry in this field to determine the local Internet domain. Typically, the fully qualified host name is added to the server document during server setup or by the Administration process. A routing loop can result if this field does not contain a valid entry.
Click Ports->Internet Ports->Mail
In the Mail (SMTP Inbound) colum,ensure that the TCP/IP port status is set to Enable, and then click "Save and Close"
SMTP listener task: Enable
Set up how address are resovled on inbound and outbound mail
Set up s smart host
DA->Configurations->Messaging->Configurations->Edit configuration->Router/SMTP->Basic
Local Internet domain smart host
The host name for the serve that hosts the directory for SMTP recipients who are not in the Local Domino Directory. To provide a level of failover and load-balancing, specify a host name that maps an existing MX record. You can also specify IP address.
Note:
If this field contains a host name entry and the field "Verify that local domain recipients exit in the Domino Directroy" is enabled, messages addressed to local recipients that can not be resoved are not accept; thereore, there is no transfer of messages to the smart host.
Smart host is used for all local Internet domain recipients:
Choose one:
v Enabled to route all incoming SMTP messages to the smart host for lookup before routing elsewhere.
v Disabled (default) to route only messages whose recipients are not found in the Domino Directory to the smart host for lookup.
Note: If this field is set to Enabled, and the field ″Verify that local domain recipients exist in the Domino Directory″ is enabled, messages are received only for recipients whose names can be resolved in the Domino Directory. If this field is set to Enabled, and messages are accepted, all of these messages for local recipients are forwarded to the smart host.
Set up a server to receive mail for multiple internet domains
Create a Global Domain document
DA->Configuration->Messaging->Domain->Add Domain->Global Domain->Basic
Complete the proper fields.
Domain type: Global Domain
Global domain name: (optional) A word or phrase that describes the domain. Never use the name of an existing domain for your Global Domain.
Domino domains and aliases: The Domino domain name and aliases. Domino uses the domain name and aliases when accepting mail from the alternate domains list in the Global domain document.
Conversion tab
Local primary Internet Domain:
The primary Internet domain: The primary Internet domain name that your company uses to represent themselves to the outside world.
Alternate Internet domain aliases:
Addtional Internet domain names that your company uses
Use the asterisk (*) as a wildcard to represent the names of subdomains. Wildcard use is valid only if the wildcard character appers as the first character of a given entry and represents an entire subdomain name, for example:the entry *.another.com indicats that Domino treats any subdomain of "another.com" as a local domain.
Specify how Domino looks up the recipients of incoming SMTP messages.
When Domino receives a message over SMTP, the message recipient is identified by an Internet-style address. To determine the correct destination mail file, Domino must match the SMTP address to a person document in the Domino Directory (The directroy files is names.nsf), To find a match , the router checks the $Users view of the directory. This view displays all name entries in all Person documents in the directory, inculding Internet mail addresses, as well as all user name variations, firstl names, last names, common names (CN) distinguished names (DN), short names, and soundex names.
Note:
To display the hidden $Users view: Open the directory (open names.nsf), press CTRL-SHIFT and select View->Go TO dialog box, select the view ($User) and click OK.
Inbound recipient lookups adr controlled by the Address lookup setting on the Router/SMTP->"Basic of the Configuration settings" document. This settings determines the criteria that the Router uses hen attempting to match the SMTP address on an incoming message to an entry in the $User view.
The Router matches addresses based on:
The full SMTP address only
The local part of the SMTP address (That is, the part to the left of the @ sign) only
The full SMTP address, and then if no match is found , the local part address
To specify how address are looked up
DA->Configuration->Messaging->Configurations->Router/SMTP->Basic
Exhaustive lookup: Enable - The router seraches all directories to ensure that there are no duplicate recipient names that might prevent the message from getting to the right person Performing exhaustive lookups is time0conduming and places a heavy load on the server.
Set how host names are looked up
DA->Configuration->Messaging->Configurations->Router/SMTP->Basic
Host name lookup Choose one:
Dynamic lookup only (DNS only) - The Router determines the IP address for a host by looking it up in DNS. SMTP transfer can occur only if the destination host is listed in DNS.
Local lookup only (host files only) - The Router determines the IP address for a host by looking it up in a hosts file on the local machine.
Dynamic then local - (default) The Router determines the IP address for a host by looking it up in DNS first and then checking the local hosts file if no DNS entry exists.
Enable the router to look up the sender's internet address from the person document
If the sending user’s Location document specifies an Internet address, Domino places this address in the From field of the MIME message. However, if the Location document does not specify an Internet address, Domino must obtain the address by other means. By default, Domino forms an Internet address by converting spaces in the user’s Notes address into underscores, and prefixing the names of Domino domains in the address with percent signs. For example, a Domino server in the acme.com Internet domain converts the Notes address John Smith@Notes to the Internet address John_Smith%Notes@acme.com. Domino determines the Internet domain from the Server document or the Global Domain document
DA->Configuration->Messaging->Configurations->MIME->Conversion Option->Outbound
Lookup Internet address for all Notes addresses when Internet address is not defined in document:
Addresses on all messages sent to Internet recipients must be in Internet format
(RFC 821/822 format). A Notes user may send a message to both Notes addresses
and Internet addresses. To specify how Domino converts the addresses of Notes
recipients on messages sent to the Internet, choose one:
v Enabled - On outbound Internet messages, if the address of the sender or any recipient is in Notes format, Domino looks up the user’s Internet address from the Person document and, if found, substitutes it for the Notes address before sending.
v Disabled - (default) Domino forms Internet addresses based on rules in the Global Domain document. If a Global domain document is not present, Domino constructs addresses by converting spaces into underscores and encoding Domino domains with percent signs. For example, Domino converts the Notes address John Smith@Notes to the Internet address John_Smith%Notes@acme.com
Note: When this option is disabled, Domino will continue to perform Internet address lookups if configured to do so in the field ″Internet address lookup″ in the SMTP Address Conversion section of the Conversion tab of the Global Domain document.
If the Router cannot obtain the sender’s Internet address from either the message itself or the Person document, it will construct the address. You can specify the rules for constructing this address in the Global domain document, but in the absence of a Global domain document, the Router constructs Internet addresses using the following default format:
Full_Name/Org%DominoDomain@IPDomain.TopLevelDomain
How Domino uses Global domain documents during inbound and outbound SMTP routing
When Domino receives an inbound SMTP message, it attempts to determine whether the message is for a local recipient. When the Domino Directory does not include a Global Domain document, Domino accepts only messages addressed to users in the same Internet domain as the server, as indicated in the Fully-qualified Internet host name that appears in the Server document. But if the Domino Directory includes a Global domain document, Domino can receive mail for multiple Internet domains. To determine whether to accept a message, Domino compares the domain part to the local primary Internet domain listed in the Global domain document. If it does not find a match in this field, it examines the secondary Internet domains -- the ″alternate Internet domain aliases″ -- listed in that
document.
The role of Global domain documents in determining whether to accept inbound SMTP mail: If the Domino Directory contains multiple Global domain documents, Domino uses a similar process todetermine whether a recipient is local: it first checks the primary Internet domain in each Global Domain document, and then, if it still hasn’t found a match, it continues by checking the alternate Internet domains. If the domain in the address does not match any of the domain entries in any Global domain document, the message is considered an attempt to relay, and Domino rejects the message.
Inbound address lookup when the Domino Directory contains multiple Global Domain documents:
After Domino accepts a message, the Router attempts to match the recipient’s Internet address to an entry in the Domino Directory. When looking up the recipient in the Domino Directory, if the domain suffix in the address matches an alternate Internet domain aliases defined in a Global Domain document, and no Person document includes this address, the Router performs a secondary lookup. In this secondary lookup, the Router pairs the local part of the address with the domain suffix of the primary Internet domain specified in the Global domain document. For example, a server receives a message for craig_bowker@acmewest.com. The Router searches all of the Person documents in the Domino Directory for this Internet address, but cannot find a match. However, in the Domino Directory, there is a Global domain document that includes the domain suffix
acmewest.com as an alternate Internet domain alias. In this same Global Domain document, the primary Internet domain is acme.com. After the primary lookup fails, Domino performs a secondary lookup, using the address craig_bowker@acme.com. Domino performs secondary lookups only if the Router is configured to perform fullname, or fullname, then local part lookups. In cases where the Domino Directory contains multiple Global domain documents, and a secondary lookup is required, when replacing the domain suffix in the original address with the domain suffix of the primary Internet domain, the Router only considers Global domain documents that list the alternate Internet domain alias. That is, Domino always replaces the domain suffix from within a given document;
it never replaces an alternate domain listed in one document with a primary domain from another document. To prevent the Router from using domain aliases when looking up addresses, do not include alternate Internet domain aliases in a Global domain document. Instead, create multiple Global Domain documents, each specifying a different primary Internet domain.
Controlling outbound addresses construction with multiple Global domain documents: When the Domino Directory contains a single Global Domain document, the address construction rules in that document determine how a server forms the sender’s address in an outbound SMTP message. However, if the Domino Directory contains multiple Global Domain documents, when constructing the sender’s address, Domino uses the Internet domain specified in the Server document and the address construction rules defined in the Global Domain document listed last, alphabetically, in the directory. If you want Domino to form the sender’s outbound address from the primary Internet domain and the address construction rules contained in a particular Global domain document, designate that document as the default Global Domain document.
Designating a default Global domain document:
When there are multiple Global Domain documents in the Domino Directory, designate one as the default so that when a servers construct a sender’s outbound Internet address, the addresses created are based on the primary Internet domain and address construction rules specified in the designated document.
1. From the Domino Administrator, click the Configuration tab and then expand the Messaging section.
2. Choose Domains, and click Global Domain
3. Select the Global Domain document you want to designate as the default and click Edit Domain.
4. On the Basics tab, complete following field, and then click Save & Close
Use as default Global Domain (for use with all Internet protocols except HTTP)
Select Yes to designate this Global Domain document as the default Global
domain for this Domino Directory.
Update the SMTP configuration
The SMTP service controls the SMTP listener on the Domino server. By default, whenever you restart the SMTP service, and at two-minutes intervals thereafter, the SMTP service automatically checks the Notes.ini filr. Configuration settings document, and Server document to see if any settings have changed. If the service detects that settings have changed. it rebulids its internal cofiguration to incorporate the changes.
You can use a server console command to manually trigger such a service update, Using the console command allows you to immediately put into effec changes to the SMTP configuration without disrupting normal service operation.
To update the SMTP service configuration
1)Modify settings in the Notes.ini, configuration settings document, or server document
2)Run Tell smtp update config.
Start/stop/restart mail router
Stop/start/restart router
tell router quite
load router
DA->server->Status->Server tasks->right click router->Stop/start/restart task
Recalculating the server's routing table
By default, at intervals of approximately 5 minutes, or after you restart the task, the router examines the Domino Directory for changes that would warrant rebuilding the routing table.
Force update the server's routing table.
Tell router update config
(The router checks the server , server configuration, connection, Adjacent and Non-Adjacent domain documents, and the Notes.in file for changes that might effect the routing topology. The Router then builds a new router table that incorporates that changes. The router repocess any messages currently in mail.box based on the new routing table)
Notice:
The email message will be hold on mail.box when you send email ,if the router has been stopped.
Router configuration example
Use one server for all Internet messages

The following is the configuration steps. (You can find the details of every step on the following document)
1)Enable "SMTP used when sending message outside of the local internet domain" for Mail2
2)Enable SMTP listener task for Mail2
3)Set up DNS correctly to list Mail2 as the connecting server for domain for inbounding mail
4)Enable "SMTP allowed outside of the local internet domain" for Mial1 & Mail3 and listing Mail2 as relay host. (Mail1 & Mail3 use SMTP to transfer message to Mail2)
Or Create a Foreign SMTP Domain document and SMTP connection document that define the route to Mail2 (This way Mail1 & Mail3 use notes routeing to transfer to Mail2)
Use separate servers for inbound and outbound Internet mail

1)Enable "SMTP used when sending message outside of the local Internet domain" for Mail2
2)Enable SMTP listener task for Mail3
3)Set up DNS correctly to list Mail3 as the connecting server for domain for inbounding mail
4)Enable "SMTP allowed outside of the local Internet domain" for Mail1 and listing Mail2 as relay host. (Mail1 use SMTP to transfer message to Mail2)
Or Create a Foreign SMTP Domain document and SMTP connection document that define the route to Mail2 (This way Mail1 use notes routing to transfer to Mail2)
Use two servers to balance Internet mail load

1)Enable "SMTP used when sending message outside of the local Internet domain" for Mail1 & Mail3
2)Enable SMTP listener task for Mail1 & Mail3
3)Set up DNS correctly to list Mail1 & Mail3 as the connecting server for domain for receive inbound mail
4)Enable "SMTP allowed outside of the local internet domain" for Mial2 & Mail4 and listing Mail1 & Mail3 as relay host. (Mail1 use SMTP to transfer message to Mail2)
Or Create a Foreign SMTP Domain document and SMTP connection document that define the route to Mail1 or Mail3 (This way Mail1 use notes routing to transfer to Mail2)
Use SMTP to route mail within the local Internet domain

1)Enable SMTP listener task for Mail1 Mail2 & Mail3
2)Enable "SMTP allowed within the local internet domain" for "MIME message only" for Mail1 Mail2 & Mail3
3)Either having all three server sin same Notes name network or Enable "Servers within the local Domino domain are reachable via SMTP over TCPIP" for each server.
4)Enter the server's Fully quality internet host name field on the Basic tab of the server document,. The local Router uses the value in this field to define the local internet domain in the absence if a Global Domain document. Other Domino servers on the network check this field before attempting inbound SMTP connections to this server. If the field is blank or contains an invalid value, all inbound mail transfers take place over Notes routing.
Notice
The servers must be in the same Notes named network, based on TCP/IP
Mail routing between a third-party server and Domino in the same Internet domain

1)Enable the SMTP listener task for Mail2
2)Set up DNS correctly
3)Create a Foreign SMTP Domain document for "*.non-Notesserver.acme.com" and SMTP connection document that links to mail2.
4)Enable "SMTP used when sending messages outside of the local Internet domain″
(If the recipient has a mail file on the third-party server, non-Notesserver.acme.com, their Person document has a forwarding address with the domain ″non-Notesserver.acme.com.″ To route mail over SMTP, Mail1 and Mail3 find a Foreign SMTP Domain document for ″*.non-Notesserver.acme.com″ that corresponds to an SMTP Connection document listing
Mail2 as the server to which to transfer messages. The server sends the message via Notes routing toMail2, which has the field ″SMTP used when sending messages outside of the local Internet domain″enabled on the Router/SMTP-Basics tab of the Configuration Settings document that applies to it. If the message is in Notes format, Mail2 converts it to MIME. Mail2 connects to non-Notesserver.acme.com over TCP/IP and transfers the message over SMTP.
If a user on non-Notesserver.acme.com sends a message to a user on Mail1, Mail2, or Mail3, the server transfers the message over SMTP to Mail2, which has the SMTP listener task enabled on the Basics tab of its Server document, and Mail2 routes the message to its destination over Notes routing.) Use a smart host

1)Set up DNS correctly
2)Enable "SMTP allowed within the local internet domain" for "MIME messages only" for Mail1 Mail2 & Mail3
3)List "smarthost.acme.com" as the "Lcal internet domain smart host" for Mail1 Mail2 & Mail3.
Use all servers to route outbound mail and one to route inbound mail

1)Enable "SMTP used when sending message outside of the local Internet domain" for all three servers.
2)Enable the SMTP listener task for Mail2
3)Set up DNS corredtly to list Mail2 as the connecting server for the acme.com domain for inbound mail.
Create a configuration settings document.
Configuration settings document includes settings thar affect both Notes routing and SMTP routing.
Each server checks the cofiguration settings document in the following order-- a document specific to the server, then a group document for any group the server is in, and then for the default document.
DA->Configuration->Messaging->Configuration->Add configutration->Create a new configuration settings document->Basics->Save & Close.
Set up Notes Routing
To set up routing between servers that are not in the same Notes name network, you must create documents in Domino Directory to specify how to route mail which in the Notes mail system.
(Create connection document to enable message transfer between servers in differern Notes named networks. A connection document specifies how and when two servers connect to exxhange mail and update common database through replication. To route mail between servers in different Notes named networks requires a pair of Connection document, one from each server to the other)
Adjacent Domain
Note:
To define routes between adjacent domains, create a connection documents.
If you deny a domian from sending mail through your domain, the router denies all mail received from that domain, including messages the domain may have passed on from another, non-adjacent domain. There is no way to restrict specific users from routing a Notes Domain, Restrictions apply to all users in specified domain.
DA->Cofiguration->Messaging->Domians->Add Domain->Create a new Domain->Basic complete the proper fields.
Notice
The current Domino domain must have a connection document to this domain.
Non-Adjacent Domain
You can use Non-Adjacent domain to connect to two domain which will supply next-hop domain information.
DA->Cofiguration->Messaging->Domians->Add Domain->Create a new Domain (Select Non-adjacent Domain)->Basic complete the proper fields.
Note: You cannot use wildcards in the restriction fields. You must enter explicit domain names.
By definition , all servers in a domain use the same Domino Directory, only one Non-adjacent domain document is required for each non-adjacent domain. You do not have to create a separate document for each server.
Set up router to external application gateway
Create a Foreign domain document
DA->Cofiguration->Messaging->Domians->Add Domain->Create a new Domain (Select Foreign domian)->Basic complete the proper fields.
Send mail outside the local internet domain
1)Use Relay host
In the configuration settings document that apply to any mail servers that do not connect directly to the Internet, enter the host name of the designated relay host in the "Relay host for messages leaving the local Internet domain" field. When the Router on these internal servers finds a message addressed to a recipient in an external Internet domain, it looks up the specified relay host in the DNS and foreards the message to it.
A relay host is an SMTP server that receives mail form other servers and then transfers. or relays, it to the next SMTP server on the route to the recipient's domain. A relya host can be a Domino SMTP server . or a non-Domino SMTP host
2)Use Foreign SMTP Domain document and an SMTP connection document. (It only can be used between Domino server)
To set this up using Notes protovols, Create a Foreign SMTP Domain document and an SMTP connection document.When the router on a server not connected directly to the Internet find a message address to a recipient in an exteral Internet Domain, the router forwards the message to the Domain in the Foreigh SMTP Domain document, which is connected to the server with an Internet connection by the SMTP Connection document,. When that server receives the message, Its Router connects to the external Internet domain and routes the message.
Notes
If you use a wildcard when specifying which messages to route a domian, you can still restrict messages detined for specific Internet domains using the SMTP Outbound Controls in the Configuration Settings document.
The Router always uses the Foreign SMTP Domain document that most closly match the address. After the Router determins which Foreign SMT Domain document most colosely matches the address of the message, it forwards the message to the specified next domain. If the domain is a real Domino domain. the Router looks in the Domino Directory for a connection to that domain and routes the message. If the domain is a logical domain, the Router checks for an SMTP connection document that describs the next hop for mail routed to that domain.
Create foreign SMTP domain document
DA->Cofiguration->Messaging->Domians->Add Domain->Create a new Domain (Select Foreign SMT domian)->Basic complete the proper fields.
Notice:
Messages Address to Internet Domain: *.*
It means all internet Domain.
Create an SMTP connection document
DA->Configuration->Messaging->connection->Add connection->Basic (Select SMTP)
Source server:The name of the SMTP-enable serverwhere non-SMTP servers send mail destined for the Internet Domains specified in the Foreign SMTP domain document. This server must have access to DNS and have SMTP enabled for sending message outside the local internet domain.
Destination server: A unique, ficitious. placeholder name-- such as all_inernal hosts. Domino does not use the value in this field, but the Connection document will not work if the field is empty. The name you specify must not match the name of any server on ther network.
Destination Domain: The fictitious, logical domain name specified in the internet Domain name field of the corresponding Foreign SMTP domain document. The name in this field links this SMTP connection document with the Foregin SMTP Domain document.
SMTP MTA relay host:
Sepcifies the SMTP host to which the source server transfers outbound mail. This allows a SMTP server to further split internet destinations and configure multiple relays.
If this field is blank, the router transfers outbound mail to the relay host specified in the server's Configuration setting document.
If there is no relay host specified in either this filed ot in the Configuration setting document, the router determines the next hop by looking up the destination domain in the DNS or a local hosts file, depending on the value of "Host name resolution" field on the Router/SMTP- basic tab of the Configuration settings document.
Replication task: Disable
Routing tasl: Mail routing (Because the same routing task is responsible for transferring message over NRPC and SMTP, there's no need to specify SMTP routing. The source server must have SMTP routing enable in it's server document; otherwise, the router discards the information in the SMTP document)
Prepare to send an receive mail to the internet
In some case, a company may have mutiple Internet domain names. Enter thes names as aliases in the Global domain document. And make sure that the DNS is set up to inculde all the Internet domain names that your company uses.
Set up SMTP routing to external Internet domains
DA->Configurations->Configuration settings->Edit Configuration->Touter/SMTP->Basic->Enable "SMTP used when sending message outside the local Internet domain"
rstart router
Set up SMTP routing within the lcoal Internet domain
DA->Configurations->Configuration settings->Edit Configuration->Router/SMTP->Basic-> Select All message on "SMTP allow within the local Internet domain" field.
{SMTP allowed within the local Internet domain
Choose one:
v MIME messages only -- The Router uses SMTP to transfer MIME messages to other Domino servers that are within the same Domino domain and that run the SMTP
Listener.
v Disabled (default) -- The Router uses Notes routing to transfer mail to other servers in the same Domino domain.
v All messages -- The Router uses SMTP to transfer both Notes format and MIME format messages to other Domino servers that are within the same Domino domain and that run the SMTP Listener. This will cause Notes format messages to be converted to MIME format before being transferred. This may cause loss of fidelity and performance. For example, Notes Doclinks will not work.
Note: You can limit the use of SMTP to transfer mail within the Domino domain by
setting the next field (″Servers within the local Domino domain are reachable via
SMTP over TCPIP″) to only allow SMTP within the same Notes named network.
Servers within the local Domino domain are reachable via SMTP over TCPIP
v Always (default) -- The Router can use SMTP to transfer mail to any Domino server in the local Domino domain that runs the SMTP Listener.
v Only if in same Notes named network -- The Router can use SMTP to transfer mail to other Domino servers in the local Domino domain only if the destination server is in the same Notes named network. If the destination server is in the local Domino domain, but resides in a different Notes named network, the Router must use Notes routing to transfer mail.}
Enable a server to receive mail send over SMTP routing
DA->Configuration->Server->select server document->edit server->Basic
Fully qualified internet host name:
In the absence of a Global Domain document, the router use the entry in this field to determine the local Internet domain. Typically, the fully qualified host name is added to the server document during server setup or by the Administration process. A routing loop can result if this field does not contain a valid entry.
Click Ports->Internet Ports->Mail
In the Mail (SMTP Inbound) colum,ensure that the TCP/IP port status is set to Enable, and then click "Save and Close"
SMTP listener task: Enable
Set up how address are resovled on inbound and outbound mail
Set up s smart host
DA->Configurations->Messaging->Configurations->Edit configuration->Router/SMTP->Basic
Local Internet domain smart host
The host name for the serve that hosts the directory for SMTP recipients who are not in the Local Domino Directory. To provide a level of failover and load-balancing, specify a host name that maps an existing MX record. You can also specify IP address.
Note:
If this field contains a host name entry and the field "Verify that local domain recipients exit in the Domino Directroy" is enabled, messages addressed to local recipients that can not be resoved are not accept; thereore, there is no transfer of messages to the smart host.
Smart host is used for all local Internet domain recipients:
Choose one:
v Enabled to route all incoming SMTP messages to the smart host for lookup before routing elsewhere.
v Disabled (default) to route only messages whose recipients are not found in the Domino Directory to the smart host for lookup.
Note: If this field is set to Enabled, and the field ″Verify that local domain recipients exist in the Domino Directory″ is enabled, messages are received only for recipients whose names can be resolved in the Domino Directory. If this field is set to Enabled, and messages are accepted, all of these messages for local recipients are forwarded to the smart host.
Set up a server to receive mail for multiple internet domains
Create a Global Domain document
DA->Configuration->Messaging->Domain->Add Domain->Global Domain->Basic
Complete the proper fields.
Domain type: Global Domain
Global domain name: (optional) A word or phrase that describes the domain. Never use the name of an existing domain for your Global Domain.
Domino domains and aliases: The Domino domain name and aliases. Domino uses the domain name and aliases when accepting mail from the alternate domains list in the Global domain document.
Conversion tab
Local primary Internet Domain:
The primary Internet domain: The primary Internet domain name that your company uses to represent themselves to the outside world.
Alternate Internet domain aliases:
Addtional Internet domain names that your company uses
Use the asterisk (*) as a wildcard to represent the names of subdomains. Wildcard use is valid only if the wildcard character appers as the first character of a given entry and represents an entire subdomain name, for example:the entry *.another.com indicats that Domino treats any subdomain of "another.com" as a local domain.
Specify how Domino looks up the recipients of incoming SMTP messages.
When Domino receives a message over SMTP, the message recipient is identified by an Internet-style address. To determine the correct destination mail file, Domino must match the SMTP address to a person document in the Domino Directory (The directroy files is names.nsf), To find a match , the router checks the $Users view of the directory. This view displays all name entries in all Person documents in the directory, inculding Internet mail addresses, as well as all user name variations, firstl names, last names, common names (CN) distinguished names (DN), short names, and soundex names.
Note:
To display the hidden $Users view: Open the directory (open names.nsf), press CTRL-SHIFT and select View->Go TO dialog box, select the view ($User) and click OK.
Inbound recipient lookups adr controlled by the Address lookup setting on the Router/SMTP->"Basic of the Configuration settings" document. This settings determines the criteria that the Router uses hen attempting to match the SMTP address on an incoming message to an entry in the $User view.
The Router matches addresses based on:
The full SMTP address only
The local part of the SMTP address (That is, the part to the left of the @ sign) only
The full SMTP address, and then if no match is found , the local part address
To specify how address are looked up
DA->Configuration->Messaging->Configurations->Router/SMTP->Basic
Exhaustive lookup: Enable - The router seraches all directories to ensure that there are no duplicate recipient names that might prevent the message from getting to the right person Performing exhaustive lookups is time0conduming and places a heavy load on the server.
Set how host names are looked up
DA->Configuration->Messaging->Configurations->Router/SMTP->Basic
Host name lookup Choose one:
Dynamic lookup only (DNS only) - The Router determines the IP address for a host by looking it up in DNS. SMTP transfer can occur only if the destination host is listed in DNS.
Local lookup only (host files only) - The Router determines the IP address for a host by looking it up in a hosts file on the local machine.
Dynamic then local - (default) The Router determines the IP address for a host by looking it up in DNS first and then checking the local hosts file if no DNS entry exists.
Enable the router to look up the sender's internet address from the person document
If the sending user’s Location document specifies an Internet address, Domino places this address in the From field of the MIME message. However, if the Location document does not specify an Internet address, Domino must obtain the address by other means. By default, Domino forms an Internet address by converting spaces in the user’s Notes address into underscores, and prefixing the names of Domino domains in the address with percent signs. For example, a Domino server in the acme.com Internet domain converts the Notes address John Smith@Notes to the Internet address John_Smith%Notes@acme.com. Domino determines the Internet domain from the Server document or the Global Domain document
DA->Configuration->Messaging->Configurations->MIME->Conversion Option->Outbound
Lookup Internet address for all Notes addresses when Internet address is not defined in document:
Addresses on all messages sent to Internet recipients must be in Internet format
(RFC 821/822 format). A Notes user may send a message to both Notes addresses
and Internet addresses. To specify how Domino converts the addresses of Notes
recipients on messages sent to the Internet, choose one:
v Enabled - On outbound Internet messages, if the address of the sender or any recipient is in Notes format, Domino looks up the user’s Internet address from the Person document and, if found, substitutes it for the Notes address before sending.
v Disabled - (default) Domino forms Internet addresses based on rules in the Global Domain document. If a Global domain document is not present, Domino constructs addresses by converting spaces into underscores and encoding Domino domains with percent signs. For example, Domino converts the Notes address John Smith@Notes to the Internet address John_Smith%Notes@acme.com
Note: When this option is disabled, Domino will continue to perform Internet address lookups if configured to do so in the field ″Internet address lookup″ in the SMTP Address Conversion section of the Conversion tab of the Global Domain document.
If the Router cannot obtain the sender’s Internet address from either the message itself or the Person document, it will construct the address. You can specify the rules for constructing this address in the Global domain document, but in the absence of a Global domain document, the Router constructs Internet addresses using the following default format:
Full_Name/Org%DominoDomain@IPDomain.TopLevelDomain
How Domino uses Global domain documents during inbound and outbound SMTP routing
When Domino receives an inbound SMTP message, it attempts to determine whether the message is for a local recipient. When the Domino Directory does not include a Global Domain document, Domino accepts only messages addressed to users in the same Internet domain as the server, as indicated in the Fully-qualified Internet host name that appears in the Server document. But if the Domino Directory includes a Global domain document, Domino can receive mail for multiple Internet domains. To determine whether to accept a message, Domino compares the domain part to the local primary Internet domain listed in the Global domain document. If it does not find a match in this field, it examines the secondary Internet domains -- the ″alternate Internet domain aliases″ -- listed in that
document.
The role of Global domain documents in determining whether to accept inbound SMTP mail: If the Domino Directory contains multiple Global domain documents, Domino uses a similar process todetermine whether a recipient is local: it first checks the primary Internet domain in each Global Domain document, and then, if it still hasn’t found a match, it continues by checking the alternate Internet domains. If the domain in the address does not match any of the domain entries in any Global domain document, the message is considered an attempt to relay, and Domino rejects the message.
Inbound address lookup when the Domino Directory contains multiple Global Domain documents:
After Domino accepts a message, the Router attempts to match the recipient’s Internet address to an entry in the Domino Directory. When looking up the recipient in the Domino Directory, if the domain suffix in the address matches an alternate Internet domain aliases defined in a Global Domain document, and no Person document includes this address, the Router performs a secondary lookup. In this secondary lookup, the Router pairs the local part of the address with the domain suffix of the primary Internet domain specified in the Global domain document. For example, a server receives a message for craig_bowker@acmewest.com. The Router searches all of the Person documents in the Domino Directory for this Internet address, but cannot find a match. However, in the Domino Directory, there is a Global domain document that includes the domain suffix
acmewest.com as an alternate Internet domain alias. In this same Global Domain document, the primary Internet domain is acme.com. After the primary lookup fails, Domino performs a secondary lookup, using the address craig_bowker@acme.com. Domino performs secondary lookups only if the Router is configured to perform fullname, or fullname, then local part lookups. In cases where the Domino Directory contains multiple Global domain documents, and a secondary lookup is required, when replacing the domain suffix in the original address with the domain suffix of the primary Internet domain, the Router only considers Global domain documents that list the alternate Internet domain alias. That is, Domino always replaces the domain suffix from within a given document;
it never replaces an alternate domain listed in one document with a primary domain from another document. To prevent the Router from using domain aliases when looking up addresses, do not include alternate Internet domain aliases in a Global domain document. Instead, create multiple Global Domain documents, each specifying a different primary Internet domain.
Controlling outbound addresses construction with multiple Global domain documents: When the Domino Directory contains a single Global Domain document, the address construction rules in that document determine how a server forms the sender’s address in an outbound SMTP message. However, if the Domino Directory contains multiple Global Domain documents, when constructing the sender’s address, Domino uses the Internet domain specified in the Server document and the address construction rules defined in the Global Domain document listed last, alphabetically, in the directory. If you want Domino to form the sender’s outbound address from the primary Internet domain and the address construction rules contained in a particular Global domain document, designate that document as the default Global Domain document.
Designating a default Global domain document:
When there are multiple Global Domain documents in the Domino Directory, designate one as the default so that when a servers construct a sender’s outbound Internet address, the addresses created are based on the primary Internet domain and address construction rules specified in the designated document.
1. From the Domino Administrator, click the Configuration tab and then expand the Messaging section.
2. Choose Domains, and click Global Domain
3. Select the Global Domain document you want to designate as the default and click Edit Domain.
4. On the Basics tab, complete following field, and then click Save & Close
Use as default Global Domain (for use with all Internet protocols except HTTP)
Select Yes to designate this Global Domain document as the default Global
domain for this Domino Directory.
Update the SMTP configuration
The SMTP service controls the SMTP listener on the Domino server. By default, whenever you restart the SMTP service, and at two-minutes intervals thereafter, the SMTP service automatically checks the Notes.ini filr. Configuration settings document, and Server document to see if any settings have changed. If the service detects that settings have changed. it rebulids its internal cofiguration to incorporate the changes.
You can use a server console command to manually trigger such a service update, Using the console command allows you to immediately put into effec changes to the SMTP configuration without disrupting normal service operation.
To update the SMTP service configuration
1)Modify settings in the Notes.ini, configuration settings document, or server document
2)Run Tell smtp update config.
2008年10月22日星期三
Set up Domino search
Create Domain catalog
Domino Administrator->Configuration->Server ->Current server->Server Task->Domain Catalog->Enable->Select servers which you want to catalog->Save
Select which database to include in the Domino index
DOmino Administrator->File->Application->Open->Catalog
Hold down Ctrl-Shift and click Open->$MultiDBIndex
Use Domino Administrator to change which database will be indexed.
Domino Administrator->Files->Select database->tools->Multi-Database Index->Enable or Disable.
Select which file systems to include in the Domino Index
Domino Administrator->Files->Catalog->File system.
Fill the proper field->save & close
View search categories
Open catalog->Database->By categories
Add or Change search categories
select database->properites->Design->List in Database Catalog" select/unselect
Set Domino indexer task
DA->Configuration->Server->Current server document->edit server->Server tasks->Domain->indexed->Enable->OK->save & close
Res s
Change the location of Domino Index files
Change the parameter of notes.ini
FT_Domain_Directory_Name=directroy (The default directory is data\FTDOMAIN.DI)
Delete database from the Domain Index
DA->Files->Select Database->Tools->Database->Mutli-Database Index->Disable->OK
Enable Domino catalog on client
Domino client
Notes client->File->Mobile->Edit current localtion->Server ->Input index server name in "Catalog/domain search server" field->Save and Close
Web client
http://servername/catalog.nsf/qomainquery
Use Catalog
Lotus client->File->Document properties/properties->Meta
Do one of the following
To assign the document to an existing category, click,select one or more categories,and click OK.
To assign the documet to a new category, type the category name in the keywords field.
cilick "post to catalog"
To view content categories
Lotus client->Click the arrow to the right of the search icon:->choose Domain Search->Browse catalog->in the view pane, click content and then click by category->Expand the categories to display document and URL titles->Double Click a document to URL title to open a link to the document or URL
Change content categories
Lotus client->click the arrow to the right of the search icon->Domain search->Browser catalog->
In the view pane, click Content and then click By Category.-> Expand the categories to display document or URL titles.-> Select an entry to re-categorize and choose Actions - Edit Document.
This displays the DocContent Link document for the entry-> Specify a new category in the Keyword field->Click ″Save and Close.
2008年10月21日星期二
2008年10月20日星期一
Send email through Gateway server.
1)Enable "SMTP used when sending message outside of the local internet domain" on Gateway server.
Configuration-Server-Configuration->select server->Router/SMTP->Basic
2)Enable "SMTP listener" on Gateway server
configuration->all server document->select server->basic
3)Set replay policy on Gateway server
Configuration-Server-Configuration->select server->Router/SMTP->Restrictions & Controls..->SMTP inbound controls->Allow messages only from the following internet hosts to be sent to external internet domain (input the ip address of mail server)
3)Enable "SMTP used when sending message outside of the local internet domain" on mail server
Set relay host (Gateway server's Ip address)
Configuration-Server-Configuration->select server->Router/SMTP->Basic
Configuration-Server-Configuration->select server->Router/SMTP->Basic
2)Enable "SMTP listener" on Gateway server
configuration->all server document->select server->basic
3)Set replay policy on Gateway server
Configuration-Server-Configuration->select server->Router/SMTP->Restrictions & Controls..->SMTP inbound controls->Allow messages only from the following internet hosts to be sent to external internet domain (input the ip address of mail server)
3)Enable "SMTP used when sending message outside of the local internet domain" on mail server
Set relay host (Gateway server's Ip address)
Configuration-Server-Configuration->select server->Router/SMTP->Basic
2008年10月17日星期五
Lotus Policy management
Create a Policy
Open Domino Administrator->People & Groups->Settings->Add settings/edit settings
Select the the policy type
Fill the proper information->Click save
Select Policy->Add/Edit Policy
Input Policy name->Select policy type->Select registration->select policy settings
Create a Child policy
Select Policy->Edit Policy->Basics->Create Child
View Policy relationship
Domino Administrator->Configuration->policies->by Settings
Assign an explicit policy
Domino Administrator->People & Groups->People->Select person->Edit person->Administrator->Assigned Policy-Save
or
Domino Administrator->People & Groups->People->Select person->Tools->people->Assign policy-save
2008年10月15日星期三
Set up Calendar and schedule
Set up resource reservation database
Domino Administrator->File->Database -New->Select server->title->select Resource Reservations 8->OK
Set up the DB ACL for the resource reservations DB
Domino Administrator->File->Database->Access Control->add the proper user->assign CreateResource role to users
Set up the administrator server for the resource reservation database
Domino Administrator->file->select the resource reservation database->Tools->Database->Manage ACL->Advance->In the Administrator server field. click server and then specify a server name->OK
Create a sit and resource document
Open resource reservation database->New site->Complete proper fields
Click new resource->Complete proper fields
Delete a resource
Open resource reservation database->open resource which you want to delete->delete
->Yes->OK
Open admin4.nsf->Pending Administrator Approval->Open the Approve resource deletion request document->Edit->Approve Resource Deletion->Yes->OK
Add/Modify Holiday
Domino Administrator->Configuration->Miscellaneous-Holidays->Add/Edit holiday
To collect details calendar information from user calender
Open Domino Administrator-Configuration->Configurations->Enable "Use these settings as default settings for all users"->Extract canlendar details->Ok
2008年10月9日星期四
Ubuntu 8.04 文本界面安装 domino 8.01
1) Copy install file to Ubuntu directory.
( I have uncompressed them before coping the Domino install file to Ubuntu by winSCP)
2)Change rights for
chmod 777 /Domino/install
chmod 777 /Domino/tools/*
3) install Java VM
sudo apt-get install sun-java6-jdk
4)Add notes user
useradd -m notes
5) Install Domino
./install
6) Configure Domino
cd /local/notesdata
/opt/ibm/lotus/bin/server -listen
Run "remote server setup" on Domino Administrator client.
Input Domino server ip address. Click OK
Ubuntu简单网络配置
我在某台机子安装Ubuntu Server时,安装过程跳过了网络配置的步骤,回头在另一台机子SSH登录这台机子的时候始终不能连接,通过路由器DHCP Client Table列表中查看发现安装Ubuntu Server的这台机子并未加入网络,很是奇怪。于是在这台机子上执行命令:
$ifconfig
返回结果中只有lo,没有eth0,这才联想到可能和安装时跳过网络配置有关,只需要简单配置一下即可让这台机子正常加入网络。
$sudo pico /etc/network/interfaces
这就会启动简单文本编辑器来编辑Linux网络配置文件
在这里你应该会看到如下内容:
这个正是lo回环,我需要让这台运行Ubuntu Server的机子通过DHCP获得IP来加入网络,那么我只需要在上面的lo回环的配置内容下面加入:
按下Ctrl+O组合键即可保存,按下Ctrl+X退出。
让网络配置文件生效有两个办法:
1、重启Ubuntu:
$sudo reboot
2、重启网络组件:
$sudo /etc/init.d/networkding restart
只要显示Reconfiguring network interfaces... [OK]
即成功重启网络组件。
如果并不是通过DHCP来获得IP而是需要手动指定IP(比如192.168.1.1)并且指定网关(如192.168.1.254),那么如此配置:
如果是手动指定IP并且还需要访问互联网,比如wget下载,那么还需要设置DNS:
$sudo pico /etc/resolv.conf
向这里添加配置内容:
nameserver xxx.xxx.xxx.xxx
保存即可。
$ifconfig
返回结果中只有lo,没有eth0,这才联想到可能和安装时跳过网络配置有关,只需要简单配置一下即可让这台机子正常加入网络。
$sudo pico /etc/network/interfaces
这就会启动简单文本编辑器来编辑Linux网络配置文件
在这里你应该会看到如下内容:
auth lo
iface lo inet loopback
这个正是lo回环,我需要让这台运行Ubuntu Server的机子通过DHCP获得IP来加入网络,那么我只需要在上面的lo回环的配置内容下面加入:
auth eth0
iface eth0 inet dhcp
按下Ctrl+O组合键即可保存,按下Ctrl+X退出。
让网络配置文件生效有两个办法:
1、重启Ubuntu:
$sudo reboot
2、重启网络组件:
$sudo /etc/init.d/networkding restart
只要显示Reconfiguring network interfaces... [OK]
即成功重启网络组件。
如果并不是通过DHCP来获得IP而是需要手动指定IP(比如192.168.1.1)并且指定网关(如192.168.1.254),那么如此配置:
auth eth0
iface eth0 inet static
address 192.168.1.1
netmask 255.255.255.0
gateway 192.168.1.254
如果是手动指定IP并且还需要访问互联网,比如wget下载,那么还需要设置DNS:
$sudo pico /etc/resolv.conf
向这里添加配置内容:
nameserver xxx.xxx.xxx.xxx
保存即可。
2008年10月1日星期三
Replicas and schdeuling replication
Initiate replication
1)Replication schedule settings in a connection document take effect
2)A replication command to replicate immediately is issued at the server console. The server console commands include replicate,pull,push and load replicate.
3)Setting in a program document. The program document starts a new task on the server rather than sending work to an existing task.
4)A replication command to replicate immediately is issued by an end-user working in the Notes Client user interface. This is done from a work station only, not from a server.
5)Scheduled replication from a notes client. This is done from a workstation only.
Modify ACL for replicating files
Create a "External Servers" group & add demo/mail to the group for replication.
Add the group to ACL. I set the properties is server->manager.
Create replicas
(Make a cross certificates if you make a replica in different domain)
Domino Administrator->Select source server(It's in the server pane on the left)->Files->Select database->Tools->Database->Create Replica/Drag selected database to the create replica tool->Select one /more destination servers ->Click OK
(Select a destination server click "file Name" to choose a custom file path on the destination server for any database you're replicating, and then click OK. You can repeat this procedure for each destination server. If you don't choose this option, the data base is stored n the destination server in the same location as on the source server)
Or Drag database to destination server
1) From the Domino Administrator, click the Files tab.
2)Select one or more database you want to replicate in the files pane.
3)Drag the selected database to destination server in the server pane on the left
4)In the diaglog box that appears, select "Create replica" select a directory on the destination server in which to store the replica(s), then click OK.
Specify replication settings
Domino Administrator->Files->select database (which was replicated)->file->replication->Operations for this application.
Change the proper settings.
Schedule replicate for one specific time
Open configuration->connection->open select connection->schedule tab
In the "Connect at times" field, enter a specific time for example 8AM
In the "Repeat interval of" field, enter 0.
Schedule replicate for a list of time
In the "Connect at times" field, enter a list of specific time for example 8 AM, 1 PM, 4 PM
In the "Repeat interval of" field, enter 0.
Schedule replicate for a time range with a repeat interval
In the "Connect at times" field, enter a Time range for example 8AM- 5 PM.
In the "Repeat interval of" field, enter time interval for example 120 minutes.
Limit replication time
Domino administrator -> Configuration->connection->edit connection->Replication/Routing->Replication Time Limit
(If the "Replication Time Limit" fields has a value in it and the replication isn't complete at the end of the specified time of if the server crashes, then replication will begin where it left off once it restarts. When the field is blank, Domino uses as much time as it need to complete the replication session.
Disable Replicate
Domino Administrator->Files->Select Database->File->Replication->Operations for this application->Other->"Temporarily disable replication"
Or
Domino Administrator->Files->Select Database->Tools-Database-Replication->Disable
Force a server database to replicate
Open Database->File->Replication->Replicate->Replicate with options->Select server->Ok
View replication schedule
Domino Administrator->Replication->Replication schedule
Start the topology Maps task
Domino Administrator->Servers-status->tools->Task->start->Select Maps Extractor from the menu and then click start task->Done
Display the replication topology map
Domino Administrator->Replication->Replication topology by connection/clusters
(Double-Click any server /connection you can find the server connection or connection details)
订阅:
博文 (Atom)